A solution to HD DVD authoring
How to burn HD Video?

To my knowledge, many people have thought of burning their handy ts, .tp, .mts, or .m2ts video files, which may get from AVCHD camcorders, HDV camcorders, DVs, or wherever else, to be HD DVDs with regular recordable DVDs, but have not found out an available way to achieve this goal. If so, this guide will take you through the creation of your own HD DVDs step by step. Please go along with it.
Here I make a list of all the programs you may need:
1.
Moyea HD Video Converter
Convert video files in .ts, .tp, .mts, or .m2ts transport stream format to program stream format .mpg via this converter.
2.
Ulead Movie Factory 5 (Since I have not upgraded it to MF6 Plus)
Use this program to create an HD DVD folder on your computer.
3.
ImgBurn
Burn the HD DVD disc with ImgBurn.
Part one: Convert video files in formats of .ts, .tp, .mts, or .m2ts to .mpg via Moyea HD Video Converter.
After capturing the high definition MPEG2 files with extension of .ts, .tp, .mts, or .m2ts from your devices, now you can do format conversion work in the next moment.
1. Launch
Moyea HD Video Converter, click
Add icon to import video files.

2. Afterwards, select .mpg as the output format by clicking drop-down list of
Format. Meanwhile, hit the Folder icon in the opposite side of
Output to specify where to locate the output files. Also, you can tick checkbox
Merge into one file to combine all your files to be a single .mpg file.
3. At last, hit
Convert button to start conversion. Once it is done, press
Open to find out the resulted files.
Part two: Use Ulead Movie Factory 5 to create an HD DVD folder.
1. Run Ulead Movie Factory 5. Select
New Project > Create a Video Disc > HD DVD > OK.
2. Click the
film icon to add the video files you just converted.

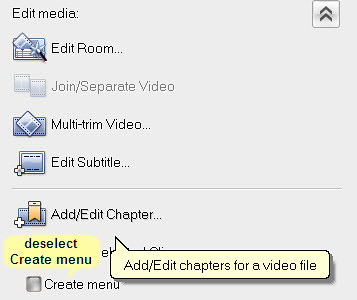
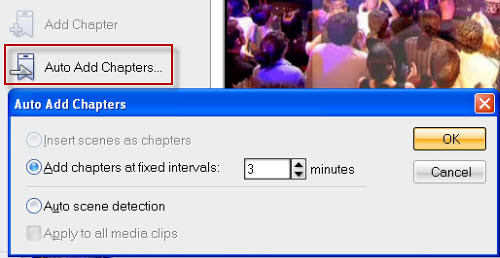
3. Deselect
Create menu, it is checked by default. And then click on
Add/Edit Chapter > Auto Add Chapters. Chapters allow you to navigate quickly through the video on your HD DVD player. When you've added all the chapters you want, click
OK.
4. Click
Next and use the pop-up screen to check playback. When you're satisfied with playback, click
Next once more.
5. Press the
Project Settings button in the lower left of the screen. Check
Do not convert compliant MPEG files, and then click
OK.
6. Tick the checkbox
Create HD DVD folders and then click the
folder icon at the end of this option to decide where you wish to create the HD DVD folder.
7. After all the above steps are completed; click the
Burn icon in the lower right to start. When the process is finished, click
OK. Your HD DVD folder is ready to burn.
Part three: Burn HD DVD folder to a recordable DVD via ImgBurn.
1. Start ImgBurn, and Select
Mode > Build > Device, and then find the
Book Type icon at the lower-right of the
Device tab. Set Book Type to
DVD+R or
DVD+R DL, but not DVD-ROM. At the same time, set your burn speed to 3x.
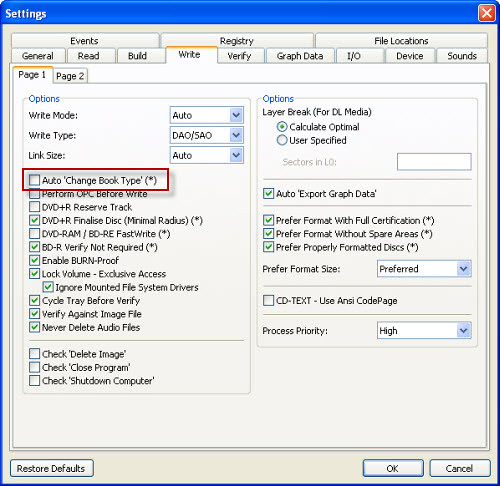
2. Select
Tools > Settings > Write, and uncheck
Auto 'Change Book Type'. Otherwise, this setting will force DVD-ROM book type regardless of what is set in the first step.
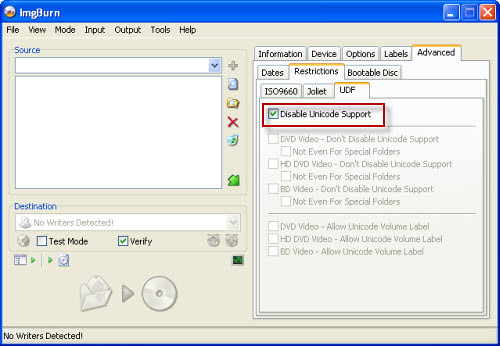
3. Find the
UDF tab through
Mode > Build Advanced > Restrictions, and Check the
Disable Unicode Support item there.
4. Click
File > Browse for a source folder to add your HD DVD folder to ImgBurn, after that click the large burn button, and then sit back and wait for the backup to burn.
By the way, if you are not familiar with the freeware ImgBurns Book Type setting, you can visit the following link to learn more:
this guide
Finally, try your new HD DVD in your HD DVD player. Well, done, for it took me a long time to figure all the above contents out, hope this helps someone absolutely.


 A solution to HD DVD authoring


 Reply With Quote
 Posting Permissions
