

Ana gyud na Bro ... expect ug mga sleepless nights ..... Pero kung makonteto nasad ka, pwerte lipaya nimo sad ... heheOriginally Posted by wooden_heart

Results 11 to 20 of 189
-
01-15-2010, 09:20 PM #11C.I.A.


- Join Date
- Nov 2007
- Posts
- 9,859
-
01-15-2010, 11:09 PM #12Junior Member

- Join Date
- Jun 2009
- Gender

- Posts
- 308
START with this then practice with your cam... (of course you need to understand the controls, so read the manual):
Learning about Exposure The Exposure Triangle
by Darren Rowse
84
del.icio.us
Twitter
StumbleUpon
Digg
 Bryan Peterson has written a book titled Understanding Exposure which is a highly recommended read if youre wanting to venture out of the Auto mode on your digital camera and experiment with its manual settings.
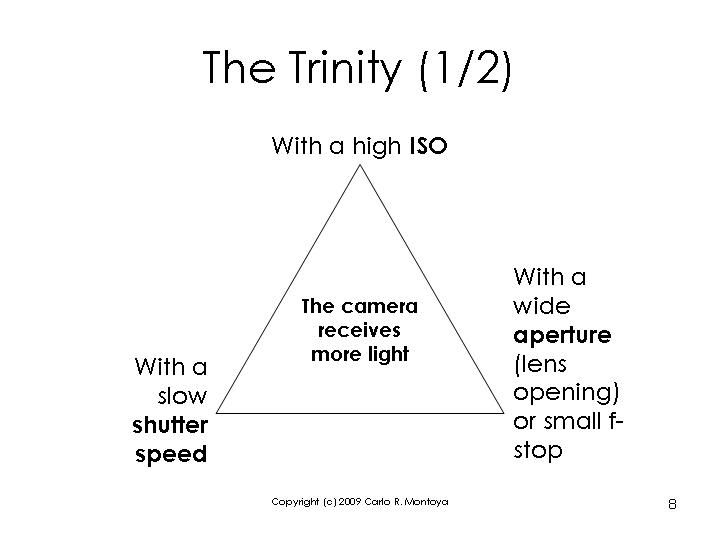
In it Bryan illustrates the three main elements that need to be considered when playing around with exposure by calling them the exposure triangle.
Each of the three aspects of the triangle relate to light and how it enters and interacts with the camera.
The three elements are:
- written a post on ISO the measure of a digital camera sensors sensitivity to light
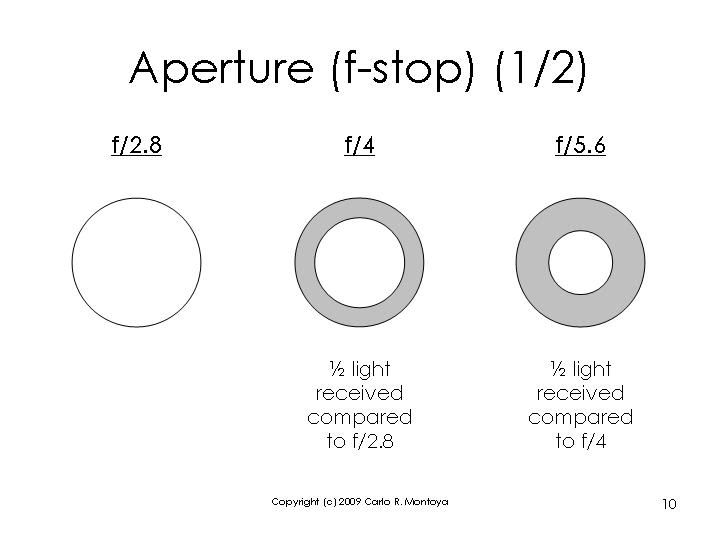
- Aperture the size of the opening in the lens when a picture is taken
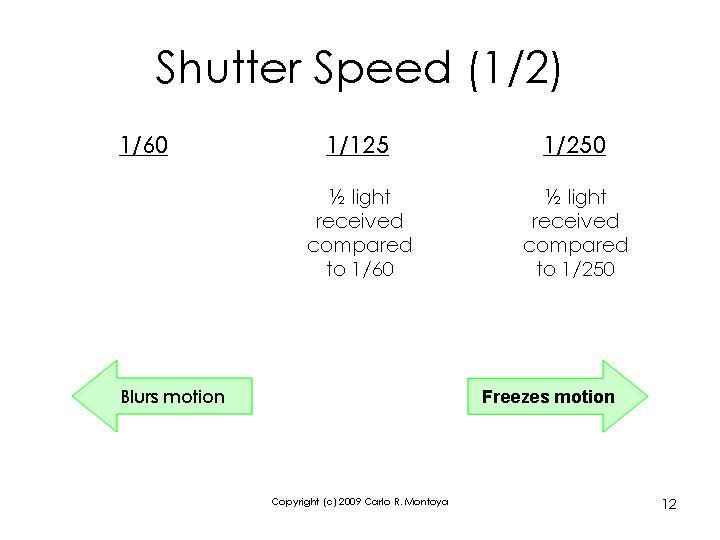
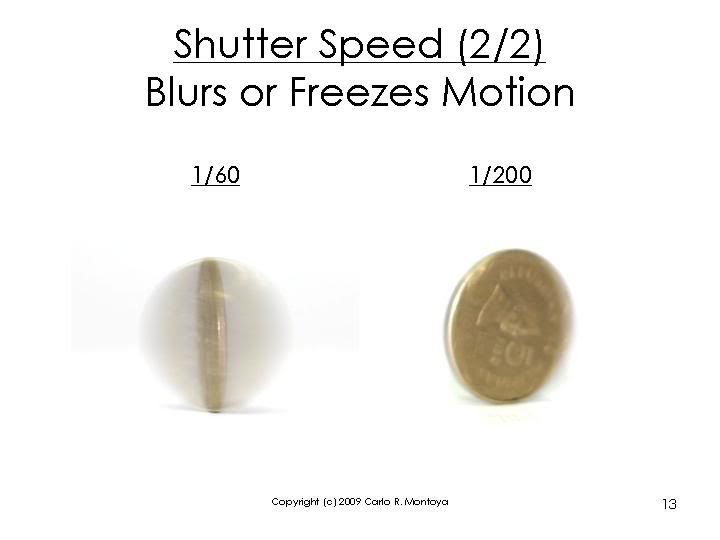
- Shutter Speed the amount of time that the shutter is open
It is at the intersection of these three elements that an images exposure is worked out.
Most importantly a change in one of the elements will impact the others. This means that you can never really isolate just one of the elements alone but always need to have the others in the back of your mind.
3 Metaphors for understanding the digital photography exposure triangle:
Many people describe the relationship between ISO, Aperture and Shutter Speed using different metaphors to help us get our heads around it. Let me share three. A quick word of warning first though like most metaphors these are far from perfect and are just for illustrative purposes:
The Window
Imagine your camera is like a window with shutters that open and close.
Aperture is the size of the window. If its bigger more light gets through and the room is brighter.
Shutter Speed is the amount of time that the shutters of the window are open. The longer you leave them open the more that comes in.
Now imagine that youre inside the room and are wearing sunglasses (hopefully this isnt too much of a stretch). Your eyes become desensitized to the light that comes in (its like a low ISO).
There are a number of ways of increasing the amount of light in the room (or at least how much it seems that there is. You could increase the time that the shutters are open (decrease shutter speed), you could increase the size of the window (increase aperture) or you could take off your sunglasses (make the ISO larger).
Ok its not the perfect illustration but you get the idea.
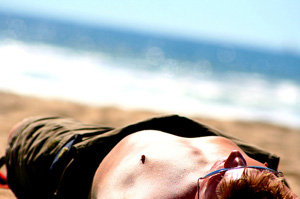
Sunbaking
Another way that a friend recently shared with me is to think about digital camera exposure as being like getting a sun tan.
Now getting a suntan is something I always wanted growing up but unfortunately being very fair skinned it was something that I never really achieved. All I did was get burnt when I went out into the sun. In a sense your skin type is like an ISO rating. Some people are more sensitive to the sun than others.
Shutter speed in this metaphor is like the length of time you spend out in the sun. The longer you spend in the sun the increased chances of you getting a tan (of course spending too long in the sun can mean being over exposed).
Aperture is like sunscreen which you apply to your skin. Sunscreen blocks the sun at different rates depending upon its strength. Apply a high strength sunscreen and you decrease the amount of sunlight that gets through and as a result even a person with highly sensitive skin can spend more time in the sun (ie decrease the Aperture and you can slow down shutter speed and/or decrease ISO).
As Ive said neither metaphor is perfect but both illustrate the interconnectedness of shutter speed, aperture and ISO on your digital camera.
Update: A third metaphor that Ive heard used is the Garden Hose (the width of the hose is aperture, the length that the hose is left on is shutter speed and the pressure of the water (the speed it gets through) is ISO.
Bringing It All Together
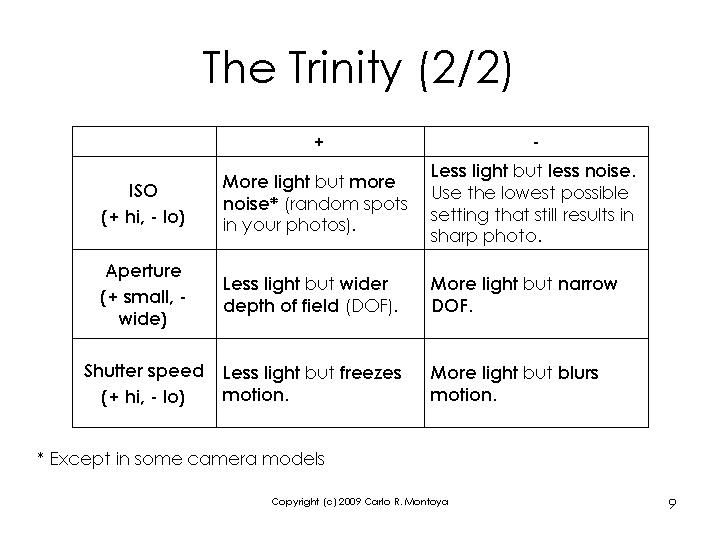
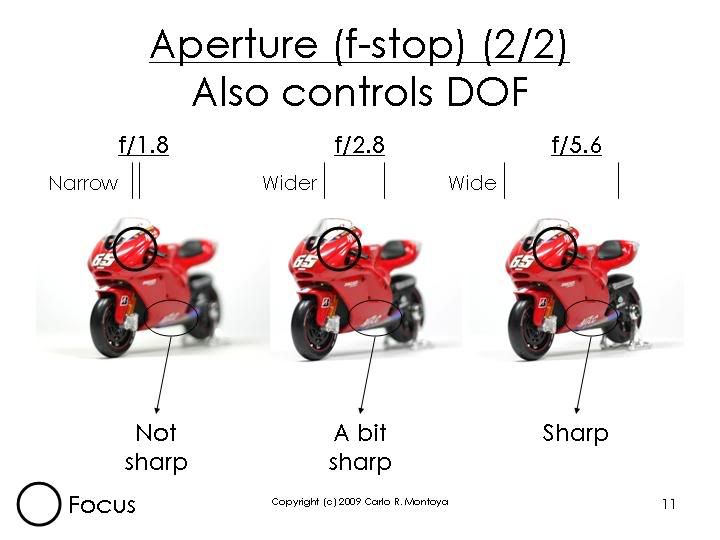
Mastering the art of exposure is something that takes a lot of practice. In many ways its a juggling act and even the most experienced photographers experiment and tweak their settings as they go. Keep in mind that changing each element not only impacts the exposure of the image but each one also has an impact upon other aspects of it (ie changing aperture changes depth of field, changing ISO changes the graininess of a shot and changing shutter speed impacts how motion is captured).
The great thing about digital cameras is that they are the ideal testing bed for learning about exposure. You can take as many shots as you like at no cost and they not only allow you to shoot in Auto mode and Manual mode but also generally have semi-automatic modes like aperture priority and shutter priority modes which allow you to make decisions about one or two elements of the triangle and let the camera handle the other elements.
A lot more can be said about each of the three elements in the exposure triangle. Check out other relevant posts on the topic at:
Read more from our Digital Photography Techniques, Photography Tips for Beginners Category
Read more: Learning about Exposure The Exposure Triangle
-
01-15-2010, 11:23 PM #13C.I.A.

- Join Date
- Jun 2009
- Gender
- Posts
- 2,680
TS the link that therealmacoy posted above really helps you, when i first acquire my cam.. libog sad ko anang exposure.. na hibong na lng ko gnhna nag take ko og picture sak2 ra. pag sunod nasad ni black, just when i found out na dapat mag timpla2 dyud diay na.. hmmm suggestion lang TS.. youtube. search did2 basic about photography. mas dali gud makaton kung visual og actual kay mas dali makasabot(base na sa akong experience. hehe) and subscribe a2 link gi hatg ni therealmacoy ako ni subscribe ko a2 the site kay ei upd8 ko permi taga weeks differnt tech. in photography.. ara ko na katon.. og cge pa ko katon.. para makaton pa dyud. nyhaha.. hope it helps.. enjoy clicking that shutter button.. ^^
-
01-15-2010, 11:39 PM #14Elite Member

- Join Date
- Oct 2005
- Posts
- 1,188
mga bros, just want to verify... ang sensor ba ang mu flip or ang mirror and the shutter blade? my confusion is based on the post above. from what i know.. it's the mirror that flips up anad the shutter blade opens up to expose the sensor at the back. libog na hinuon ko dah!
-
01-15-2010, 11:46 PM #15C.I.A.

- Join Date
- Feb 2004
- Gender
- Posts
- 6,947
very nice explanation............. up lang ko ani
-
01-15-2010, 11:59 PM #16Elite Member
- Join Date
- Jan 2004
- Posts
- 1,357
Sunny F/16

-
01-16-2010, 12:11 AM #17C.I.A.
- Join Date
- Jun 2009
- Gender
- Posts
- 2,680
hahah yeah also sunny 16 rule helpful ayu, mao na ako basis.. ^^ TS learn about sunny 16 rule also.. hehe. almost forget about that( pero naa ko copy ana naa sa camera bag gi hipos para maka hinumdum ghpon. hehe)
-
01-16-2010, 07:59 AM #18C.I.A.
- Join Date
- Mar 2005
- Gender
- Posts
- 6,754
Here are some slides from my Photography in 2 Hours Seminar/Workshop re ISO, Aperture, Shutter Speed:
---
For correct exposures, learn the Zone System. Don't rely on the camera's exposure as all cameras see in gray. Test it and see for yourself. Find a white and black paper. Put your camera in AV mode. Fill the frame with the white paper only. Shoot and the preview shows gray. Do the same with black paper. Gray.
This should get you started. If shooting white with details (snow, white t-shirt), the exposure indicator should be under +2. If shooting black with details (charcoal, black hair), then the exposure indicator should be under -2. If shooting a morena or moreno (Cesar Montano), then indicator is at 0.
Zone 3 = -2
Zone 4 = -1
Zone 5 = 0
Zone 6 = +1
Zone 7 = +2
Of course not all subjects fall exactly at any Zone System. Dark skinned Africans are at -1.5. Light skinned Asians are at 0.5 not 1 (mas puti pa rin mga Caucasians).
Canon's exposure indicator looks like the one below. It also shows you the equivalent zone system.
Good luck learning!
-
01-16-2010, 10:53 AM #19C.I.A.

- Join Date
- Jan 2007
- Gender

- Posts
- 5,047
There you go TS ubay-ubay na jud ning tips na-share sa uban members

-
01-16-2010, 11:02 AM #20Junior Member

- Join Date
- Mar 2009
- Gender
- Posts
- 298
bro ...just also bought my canon 450D karun ra jud nga month....gdala nakos office ang cam..blurred jud daw ang uban nga mga pics...mao nag take time ko to read the manual and researched about Shutter speed aperture and iso....dili nako mo eplain .naka explain nas taas tanan mga pros jud ni cla...trial and error jud ko bro..im using 18-55 kitlens IS AF nah..so far getting the grip nakos basic lighting , DOF , blurry background etc...take time lang to enjoy photography..i thought my 450D would be my first and last.pero ive changed my mind..i will soon buy a semi-pro ..and lenses ofcursz.!!

 Reply With Quote
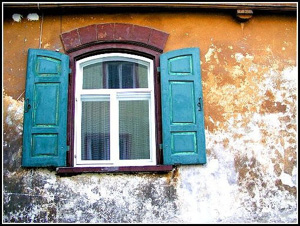
Advertisement
Similar Threads |
|
 Posting Permissions

|